One mole of an ideal gas occupies 22.4 liters at STP. In this experiment you will find 1the volume occupied by one mole of oxygen, a REAL gas, at STP and compare your value with the value for an ideal gas. You will also find from your data the 2density of oxygen at STP, 3the value of the universal gas constant R, and the 4percent potassium chlorate in your sample.
To accomplish this you will measure the weight lost and the volume of gas obtained upon heating a sample containing an unknown amount of potassium chlorate plus inert ingredients that do not decompose as the sample is heated. The potassium chlorate decomposes to give oxygen gas and potassium chloride; hence the weight loss in grams equals the grams of oxygen produced. The reactions equation is
![]()
1. From the mass of oxygen produced, you can find the moles of oxygen.
2. From the moles of oxygen and the mole relationship given by the equation for the decomposition, you can find the moles of potassium chlorate, and thus the grams of potassium chlorate in the sample.
3. From the grams of potassium chlorate and the mass of the sample, you can obtain the percent potassium chlorate in the sample.
4. The volume of oxygen gas evolved will be measured indirectly by collecting the gas by water displacement and measuring the volume of water displaced (refer to experimental setup). Keep in mind that this volume is for the oxygen collected over water at around room temperature and that day’s atmospheric pressure. Therefore, the pressure for just the oxygen component (partial pressure of oxygen) in the bottle is equal to the corrected barometer pressure (refer to How to Read a Barometer in Equipment) minus the water vapor pressure, ie,
Po2 = Patmosphere - Pwater vapor
5. To obtain the experimental molar volume of oxygen at STP, you will first need to correct this above read volume to the volume of just oxygen at STP using Dalton's Law (for the subtraction of water vapor pressure), combined gas Law (for converting to STP condition). Then the standard molar volume of oxygen can be calculated by
molar volume O2 at STP = liters of O2 at STP / moles of O2
6. The density of O2 at STP can be calculated from the molar mass and above obtained molar volume of oxygen.
7. The numerical value of R is found from the values measured in lab for the partial pressure of O2(PO2), the volume, the number of moles of O2 (n), and the temperature. The values are substituted in the equation PV = nRT and the resulting expression is solved for R.
WEAR GOGGLES WHILE IN THE LABORATORY!
Potassium chlorate is a powerful oxidizing agent and reacts readily with easily oxidized substances such as lubricating oil, rubber or glycerin. Careless handling of it could conceivably result in an explosion. Therefore, in performing this experiment, take the following precautions:
1. Use a Pyrex test tube that is clean and dry. To clean the test tube, wash with soap and water, rinse with tap water, rinse three or four times with distilled water, then flame dry it. DO NOT wipe the inside with a paper towel or blow compressed air into it. Compressed air will introduce small oil droplets with possibly disastrous results.
2. Use a paper funnel to introduce the potassium chlorate mixture into the tube, so that none is deposited high up on the wall where it might come in contact with the rubber stopper.
3. Lubricate the glass tube that fits into the rubber stopper with WATER, not glycerin.
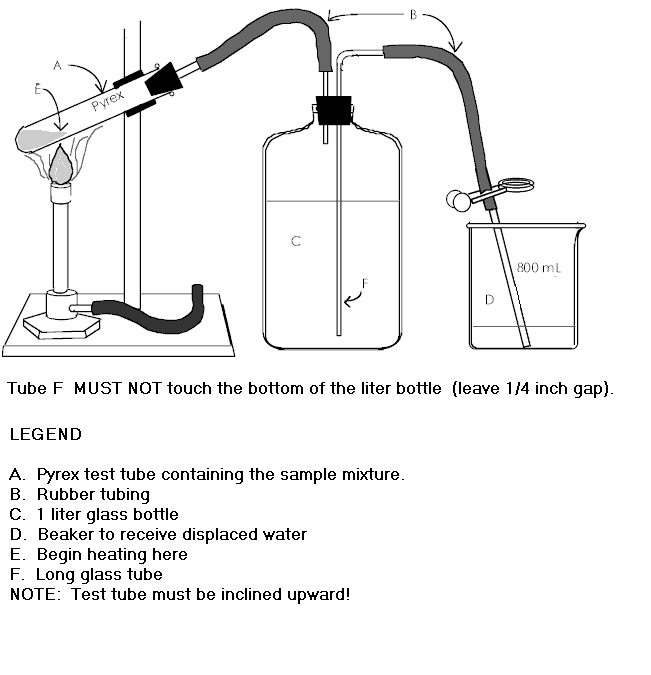
4. Clamp the test tube so that it tilts UPWARD at about a 30° angle from the horizontal.
5. Make sure that the pinch clamp on tube F (refer to the setup diagram) is OPEN before you begin heating the potassium chlorate mixture.
6. Heat the solid from the TOP DOWN with a moderately hot, CONTINUOUSLY MOVING flame. Keeping the flame in one spot may deform or melt the test tube.
7. After the experiment, dissolve the residue in the test tube in tap water and rinse it down the sink with plenty of water.
1. Before coming to class, look up the melting points of potassium chlorate and potassium chloride in the handbook.
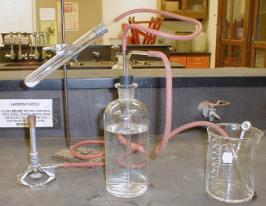
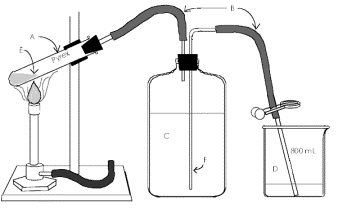
2. Assemble the apparatus as shown in the graph below (except for the test tube) and add water to the levels shown in the liter bottle and the beaker.
|
|
|
|
Setup Picture |
Setup Diagram (Another one with Legend below) |
3. Fill tube F connecting the liter bottle C with
beaker D by blowing through the rubber tube B (blow GENTLY) with the pinch
clamp OPEN. Raise and lower beaker D to expel any air bubbles from tube
F. At this point the liter bottle should be nearly full but tube B should not
touch the water in the flask. Close the pinch clamp as close to the beaker
as possible. 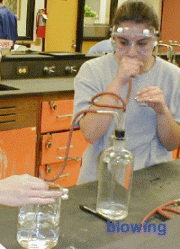
4. Obtain an unknown sample from the stockroom. RECORD ITS NUMBER ON YOUR REPORT FORM. Weigh a clean, DRY, Pyrex test tube supported by a beaker (this beaker is just for weighing, keep it the same for later), on the Mettler balance to THREE decimal places (the nearest milligram). After weighing the tube and beaker assembly REMOVE IT FROM THE BALANCE PAN, add the unknown sample to the test tube using a paper funnel, return the assembly to the balance pan and weigh it again. RECORD ALL WEIGHING DATA DIRECTLY ON YOUR REPORT FORM.
5. Attach the test tube to the remainder of the assembly. Incline the test tube upward at an angle of about 30o. Before beginning the heating process test the assembly for leaks by opening the pinch clamp. If no water flows when the clamp is opened there are no leaks. If a leak is present check the connections until you have found and corrected the leak. Have the instructor check your apparatus and initial your report form.
6. Equalize t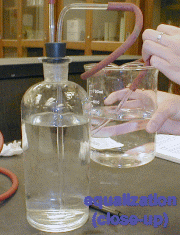 he
pressure inside the liter bottle
with atmospheric pressure as follows: With the pinch clamp open raise beaker
D until the water level in the beaker is the same as that in the liter bottle.
During this process D
he
pressure inside the liter bottle
with atmospheric pressure as follows: With the pinch clamp open raise beaker
D until the water level in the beaker is the same as that in the liter bottle.
During this process D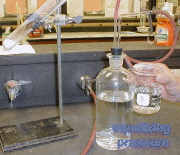 O NOT ALLOW THE TUBE IN BEAKER D TO COME
OUT OF THE WATER
(or air will get into the system). Close the pinch clamp. Discard the water
in beaker D. Read the barometric pressure and RECORD IT IN YOUR REPORT FORM.
O NOT ALLOW THE TUBE IN BEAKER D TO COME
OUT OF THE WATER
(or air will get into the system). Close the pinch clamp. Discard the water
in beaker D. Read the barometric pressure and RECORD IT IN YOUR REPORT FORM.
7. Open the pinch clamp. Leave in the beaker any water that may flow. Heat the test tube starting at the top of the salt mixture and working downward, at a rate that gives a moderate, steady rate of evolution of oxygen without propelling the mixture up the test tube toward the rubber stopper. If fumes appear inside the test tube discontinue heating until they disappear.
8. Once the experiment is started and water begins to flow MAKE SURE TUBE F REMAINS UNDER WATER or air will get into the system and cause the found volume of gas to be wrong. Continue heating for 15 minutes. Allow the apparatus to cool to room temperature WITH THE PINCH CLAMP OPEN. When the apparatus is cool to the touch (which will require several minutes) equalize the pressure then close the pinch clamp.
9. Remove test tube A from the apparatus, insert it in its supporting beaker, and weigh the assembly. Set aside for later reheating.
10. Remove the stopper from the liter bottle, insert a thermometer into the liter bottle, leave for a few minutes, and record the temperature (as the temperature of the gas). Look up the vapor pressure of water at this temperature in the Table below and RECORD IT IN YOUR REPORT FORM.
11. Measure the volume of water in Beaker D by pouring it into a graduated cylinder. Read the volume to the nearest mL and record in your report form.
12. Reheat the test tube for 5 minutes, cool and reweigh. Repeat this procedure until the weight lost between heatings is no greater than 0.005 g. Use the last weight obtained to calculate the weight of oxygen lost from the sample.
13. Dispose of the residue in the test tube by WASHING IT DOWN THE SINK WITH LOTS OF WATER. DO NOT THROW IT IN THE WASTEPAPER BASKET OR THE SOLID WASTE CONTAINERS.
|
Temp. (0C) |
Vapor Pressure (torr) |
Temp (0C) |
Vapor Pressure (torr) |
|
18 |
15.5 |
24 |
22.4 |
|
19 |
16.5 |
25 |
23.8 |
|
20 |
17.5 |
26 |
25.2 |
|
21 |
18.6 |
27 |
26.7 |
|
22 |
19.8 |
28 |
28.3 |
|
23 |
21.2 |
29 |
30.3 |